
Fast & tracked delivery
Your dose of creativity arrives quickly at your home, you can track your package right to your mailbox.

The site owner may have set restrictions that prevent you from accessing the site. Please contact the site owner for access.

✨ Jesmonite has this little magic power: even when you're starting out, your creations immediately have a stylish look (and frankly, "wow"). No need to be an artist or have a studio: you choose an idea, you test it, you progress... zero pressure .
In this article, you will find ideas for concrete objects to make with Jesmonite , a quick method to get started without complicating your life, and the finishing touches that give a truly professional result.
✨ Jesmonite is a water-based, solvent-free mineral resin , highly valued for creating decorative objects with a modern look (matte, mineral, very “design”).
It can be worked at home , without cooking, and with a very discreet odor (nothing like some resins).
And the most motivating thing: even a first creation can already elicit a "wow" reaction. 😍
⏱️ Jesmonite sets quite quickly: many pieces demold after ~30–40 minutes (depending on size and shape), then they continue to harden afterwards.
The part gains its final strength after approximately 24 hours .
In other words: you can see the result quickly , then let it "finish quietly" over a day.
💦🍽️ Quick tip: Jesmonite is porous . It's not waterproof as is. So:
🧰 For a first attempt, you can start with a very simple base:
✨ If you like the "boutique decor" look, these options make all the difference:
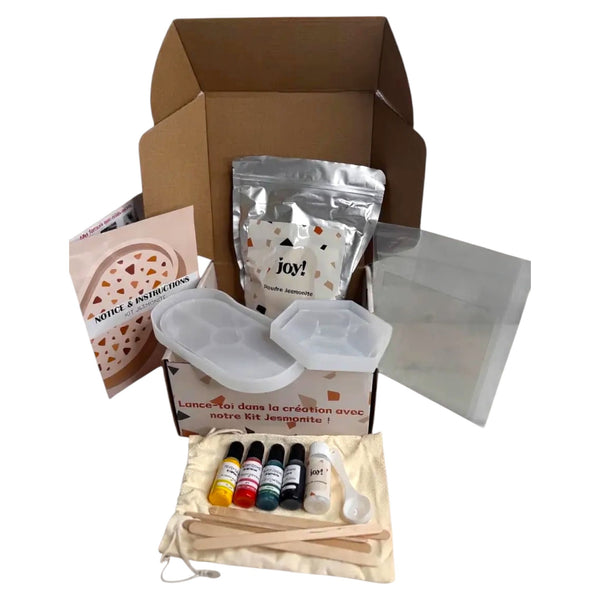
💡 If you want to get started without running around, our Jesmonite JOY! kit already includes the essentials: Jesmonite AC100, silicone molds, pigments, tools + finishing varnish , with a drying time of 30 to 40 minutes .
🫧 Anti-bubbles: simple tips
Here are some concrete, feasible and very satisfying ideas, even if you are a beginner.
Difficulty: easy
Time: 10–15 min preparation + unmolding (depending on setting time)
Mold: silicone "seashell" mold
Tip for a stunning finish: pearlescent pigments + well-sanded edges (that's what gives it that "boutique" look).
Suggested use: jewelry catch-all, key dish, small decorative item on a shelf.
Difficulty: easy
Time: 10 min + unmolding (depending on setting time)
Mold: round/square silicone mold (coaster size)
A great-looking tip: terrazzo "chips" + 1 dominant color (the less you mix, the more stylish it is)
Suggested use: set of 4 assorted, DIY gift, table decoration.
Level: easy to intermediate
Time: 15–20 min + unmolding (depending on size)
Mold: tray mold (oval, round or rectangular)
Tip for a stunning finish: soft marble effect (2 colors max) + varnish/sealer if used in wet areas (plants, bathroom, etc.)
Suggested uses: entryway “catch-all” tray, desk organizer, candle + perfume holder.
Difficulty: easy
Time: 10–15 min + unmolding (depending on setting time)
Mold: silicone "candle holder" mold (simple or designer shape)
A great-looking tip: a duo of colors (e.g., neutral base + pastel touch) + minimalist shape = instant boutique effect ✨
Suggested use: as a duo on a table, on a shelf, or as a mini gift (candle holder + candle).
Level: Intermediate (thickness + strength)
Time: 20–25 min + unmolding (depending on size)
Mold: silicone mold for a plant pot cover / cylindrical pot
A great finishing tip: apply a sealant to the inside if the object is at risk of exposure to moisture (watering, condensation). Jesmonite is porous, so this protection will prolong its lifespan.
Suggested uses: mini plant, pencil holder, brush storage.
Level: Intermediate
Time: 15–20 min + unmolding (small pieces)
Molds: mini molds (pendants, geometric shapes, small drops…)
Tip for a great finish: clean molds + clean drilling + a thin (and even) varnish for a smooth and durable result ✨
Bonus: play with soft pigments, the mini terrazzo effect, or a very light gold leaf.
Difficulty: easy
Time: 10–15 min + unmolding (depending on setting time)
Mold: simple bowl (round, oval, rectangular) or trinket tray
A great-looking tip: choose a single color (off-white, beige, terracotta, light gray, etc.) and keep a matte finish . The result: very chic, very stylish ✨
Suggested uses: entryway catch-all, jewelry tray, desk dish for small items.
Difficulty: easy
Time: 10–20 min + unmolding (depending on shape)
Mold: freeform mold, pebble, hemisphere, block, arch…
A stunning effect tip: play with inclusions : fine glitter (very light), terrazzo chips, colored shavings… for an effortlessly “studio-style” look 😍
Suggested use: paperweight, decorative object on a stack of books, light doorstop (depending on weight).
✨ If you only do one thing: lightly sand it . This is often what transforms a piece from a "nice DIY" into a "decorative object".
💦 Jesmonite is porous : it is not “naturally” waterproof. Sealers provide water and stain resistance.
Seal it, especially if the object is located in an area:
👉 And if the piece is to go outside (or be exposed), a protection system is recommended.
🟤 Little skates change everything:
Tip: place 3 or 4 under trays, coasters and candle holders (after sanding + sealant if you use it).
The bubbles arrive quickly… but are very easy to manage.
If you unmold too quickly: crumbly edges, marks, piece that “gets damaged” when sanding.
✨ Want to get started with Jesmonite quickly?
Our Jesmonite JOY! kit gives you a complete base to create whatever you want (bowls, coasters, trays, candle holders, etc.). And if you prefer to be guided, the collection also includes kits for specific items .
💡 Tip: start with a simple object (bowl or coaster), then level up.

Laetitia Jandric
Founder of JOY! · Creative Leisure Expert
A mother of three and founder of JOY! since 2022, Laetitia selects and tests each creative kit before listing it. Her articles combine practical advice, field experience feedback, and concrete recommendations to help everyone find the activity or gift that truly fits.
Learn more →
Your dose of creativity arrives quickly at your home, you can track your package right to your mailbox.

Got a problem? Don't panic, you have 15 days to change your mind.
Creative activities for young and old (from 0 to 77 years old!), perfect for disconnecting from screens and spending real time together.

JOY! is fun, colorful, and a touch of madness to dust off your creative leisure activities!