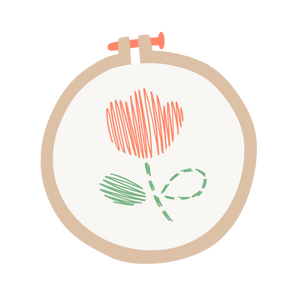
Embroidery is a bit like DIY magic: a needle, some thread, a touch of patience... and hey presto, your fabrics come to life! 🌼
Whether you're just starting out or already have a few creations under your belt, knowing basic embroidery stitches is essential for creating beautiful designs, from the simplest to the most sophisticated.
Come on, let's put on our favorite thread and discover together 18 essential embroidery stitches , with tips for succeeding every time!
💛 Click here to discover ourcomplete embroidery kits !

1. Backstitch : for precise tracing
This is the basic stitch, the one used for clean, detailed outlines . It works wonders for highlighting a pattern, writing names, or bringing a design to life.
How to achieve it?
- Insert the needle into the beginning of your row.
- Move forward a few millimeters, pull the needle out, then come back and insert it into the previous stitch.
- Repeat moving forward each time.
🧵 Pro tip: Keep your stitches even and don't pull the thread too hard to avoid puckering.
2. Stem stitch : perfect for curves and writing
This stitch follows all shapes, even the most sinuous! Ideal for flower stems , arabesques or stylized lettering.
How to do it?
- Bring the needle out at the beginning of your line.
- Stitch a little further, and bring the needle out in the middle of the previous stitch , still with the thread on the same side.
- Continue the fluid movement.
🌿 Tip: Shorten the stitches in the curves for a more harmonious result.
3. Chain stitch : for stylish borders
This is the stitch that forms small loops, like a decorative chain. We love it for borders, fancy letters or textured fillings .
Steps:
- Pull out the needle and form a loop with the thread.
- Stitch at the exit point and come out a little further, passing inside the loop.
- Pull gently: a nice stitch is formed.
🪢 Tip: Keep the tension even for a uniform and elegant chain.
4. The blanket stitch : your ally for beautiful finishes
As useful as it is pretty! This stitch delicately edges your fabrics and prevents them from fraying. It's also great for creating whimsical shapes.
Here we go :
- Bring the needle out at the edge of the fabric.
- Stitch a little further perpendicularly, leaving the thread under the needle.
- Pull gently: a loop forms.
🧶 Decorating tip: vary the spacing for a graphic or delicate effect depending on your mood!
5. Cross stitch : the darling of patterns
This is THE iconic stitch of traditional embroidery. It crosses to form Xs and makes it very easy to reproduce pixelated designs .
The cross stitch technique:
- Make a diagonal.
- Cross it the other way to form an X.
- Repeat according to your grid or pattern.
✖️ Tips: for a clean result, always keep the same orientation for all your crosses.
6. The French knot : for embroidery with relief
This small, voluminous stitch is perfect for adding 3D details : flower hearts, buttons, eyes, polka dots, etc.
Step by step:
- Pull the needle out at the desired location.
- Wrap the thread around the needle twice.
- Stitch next to the exit point, maintaining tension.
- Pull gently to form the knot.
🎀 Tip: Keep the thread taut while you stitch to prevent the knot from slipping.

7. The loop stitch : ideal for flowers and leaves
This drop-shaped stitch is used for petals, foliage, or soft textures .
How to do it?
- Take out the needle.
- Poke very close to the exit point, without pulling completely.
- Form a loop and stitch just outside to anchor it.
🌸 Vary the curl sizes for a more natural and lively effect.
8. Feather stitch : for a bohemian touch
Inspired by nature, this stitch is great for representing feathers, ears of wheat, or elegant foliage .
The steps:
- Stitch diagonally on the left side.
- Bring the needle up to the right, at the bottom of the previous stitch, leaving the thread underneath.
- Repeat alternating sides for a zigzag shape.
🍂 Tip: Work this stitch continuously, for a fluid and airy effect.
9. Spider stitch : a rose emerging from the fabric
Also called “spider rose,” this stitch creates a raised flower , full of charm. It’s a favorite in romantic projects.
We proceed as follows:
- Draw a 5-pointed star with straight stitches.
- Bring the needle to the center and wrap around the spokes .
- Continue until the center is well covered.
🌹 Tip: Use a contrasting thread to bring out the volume!
10. Sand stitch : mini stitch, maxi effect
This super simple stitch gives a textured, grainy, and elegant look, perfect for filling in areas discreetly.
Technique:
- Poke the needle in and out to make a very small stitch (1-2 mm).
- Repeat, varying the direction for a random effect.
✨ Great for starry skies, backgrounds or adding a little “grain” to a pattern.
11. The walnut point 🌰
Lesser known, but so cute! Walnut stitch looks like a small knotted spiral, very textured. It is perfect for simulating seeds, flower hearts or small buttons .
How to do it?
- Form a very tight spiral around the needle, much like a French knot, but with more wraps.
- Stitch near the exit point, keeping the spiral compact.
- Pull gently to form a small bead.
🍬 Grainy effect guaranteed!
12. Linear points : the basis of bases
Linear points include all points that form straight or winding lines. These are:
- The straight stitch
- The backstitch
- The stem stitch
- The chain stitch , etc.
They are used for drawing, structuring, underlining or writing . They are essential for tracing a pattern or creating a "line-drawn" style.
🖋 Combine with filler stitches for a professional effect.
13. Open filling points : to lighten your creations
Unlike very dense fillings, these stitches allow the fabric to breathe , while giving texture.
Among them:
- The lattice stitch (grid of intertwined threads)
- The mesh stitch
- The open grid point
🌬 Use them to fill large areas without weighing them down, such as clouds, leaves, clothes in an embroidered pattern.
14. Isolated points : small, but strong
These points are placed alone, here or there, to create an atmosphere, fill sparingly, or just decorate .
Some beloved examples:
- Knot point
- Spider stitch
- Colonial point
- Sand point
🌟 Add a few here and there to spice up an empty area!
15. The veil stitch : airy and poetic
This stitch creates a fine, light grid effect, almost like embroidered tulle. It is perfect for delicate backgrounds , or for a “revisited broderie anglaise” effect.
How to do it?
- Draw a grid of taut wires.
- Secure each intersection with a small straight stitch.
- You get an ultra-fine mesh effect.
🕊 Ideal for lightweight clothing or vintage-inspired creations.

16. The fern stitch : natural and delicate
Perfect for embroidering leaves, ferns or stylized plant motifs.
Steps:
- Embroider a center line (stem).
- On each side, make small, symmetrical, oblique stitches, which gradually move further apart.
- The result: a pretty, delicate slingshot 🌿
🍃 Use a gradient green thread for a more realistic look!
17. The herringbone stitch : graphic and chic
This stitch forms regular zigzags , perfect for borders or geometric patterns .
How to do it?
- Make a series of small Vs connected to each other, horizontally or diagonally.
- Keep the tension even for a clean effect.
📐 Pair it with metallic thread for a wow effect.
18. Nesting points : assembly games
These are stitches that are combined together to create complex, nested or repeated patterns :
- Chain + French knot
- Chevron + cross stitch
- Reverse scallop + feather stitch
🔄 The idea: create unique textures by layering techniques!
🧵 And what about modernity? Current techniques that are giving embroidery a new lease of life
Today, embroidery is reinventing itself! Here are some trends:
- 3D embroidery : we stack the stitches, we add volume with beads, wadding, etc.
- Freestyle embroidery : improvise without a pattern, following your inspiration ✨
- Punch needle embroidery : a special needle is used to push the thread through the fabric for a fluffy effect.
- Textile/embroidery mix : printed fabrics + embroidery = winning combo 🎨
🎯 Perfect for personalizing clothing, tote bags or even decorative frames!
🎒 The ideal little kit to get you started (or go further)
Here's your basic kit for embroidering like a pro:
- An embroidery hoop (15 to 20 cm = standard size)
- Embroidery needles (with a large eye)
- Mouliné thread in several colors
- A nice fabric: linen, cotton, embroidery canvas
- An erasable pen or white pencil
- A pair of fine scissors (ultra stylish, of course)
💬 Joy's advice for a beautiful finish
Embroidery is a gentle, colorful, and downright addictive art. With so many stitches to experiment with , you'll have plenty of ways to create unique pieces while relaxing.
So, to your threads, get set, embroider! ✂️💛